DCGAN Tutorial: Generate Fake Celebrity image

A beginner-friendly tutorial on DCGAN with PyTorch to generate Fake celebrity images with CelebA dataset.
GANs
Published

November 16, 2020

Keywords

GANs, PyTorch, deep learning, python

Open In Colab

This article can be opened as Jupyter Notebook to train DCGAN on CelebA dataset to generate fake celebrity images.

What is DCGAN?

DCGAN (Deep Convolutional Generative Adversarial Network) is created by Alec Radford, Luke Metz and Soumith Chintala in 2016 to train Deep Generative Adversarial Networks. In the DCGAN paper, the authors trained the network to produce fake faces of celebrities and fake bedroom images.

The architecture consists of two networks - Generator and Discriminator. Generator is the heart of GANs. It produces real looking fake images from random noise.

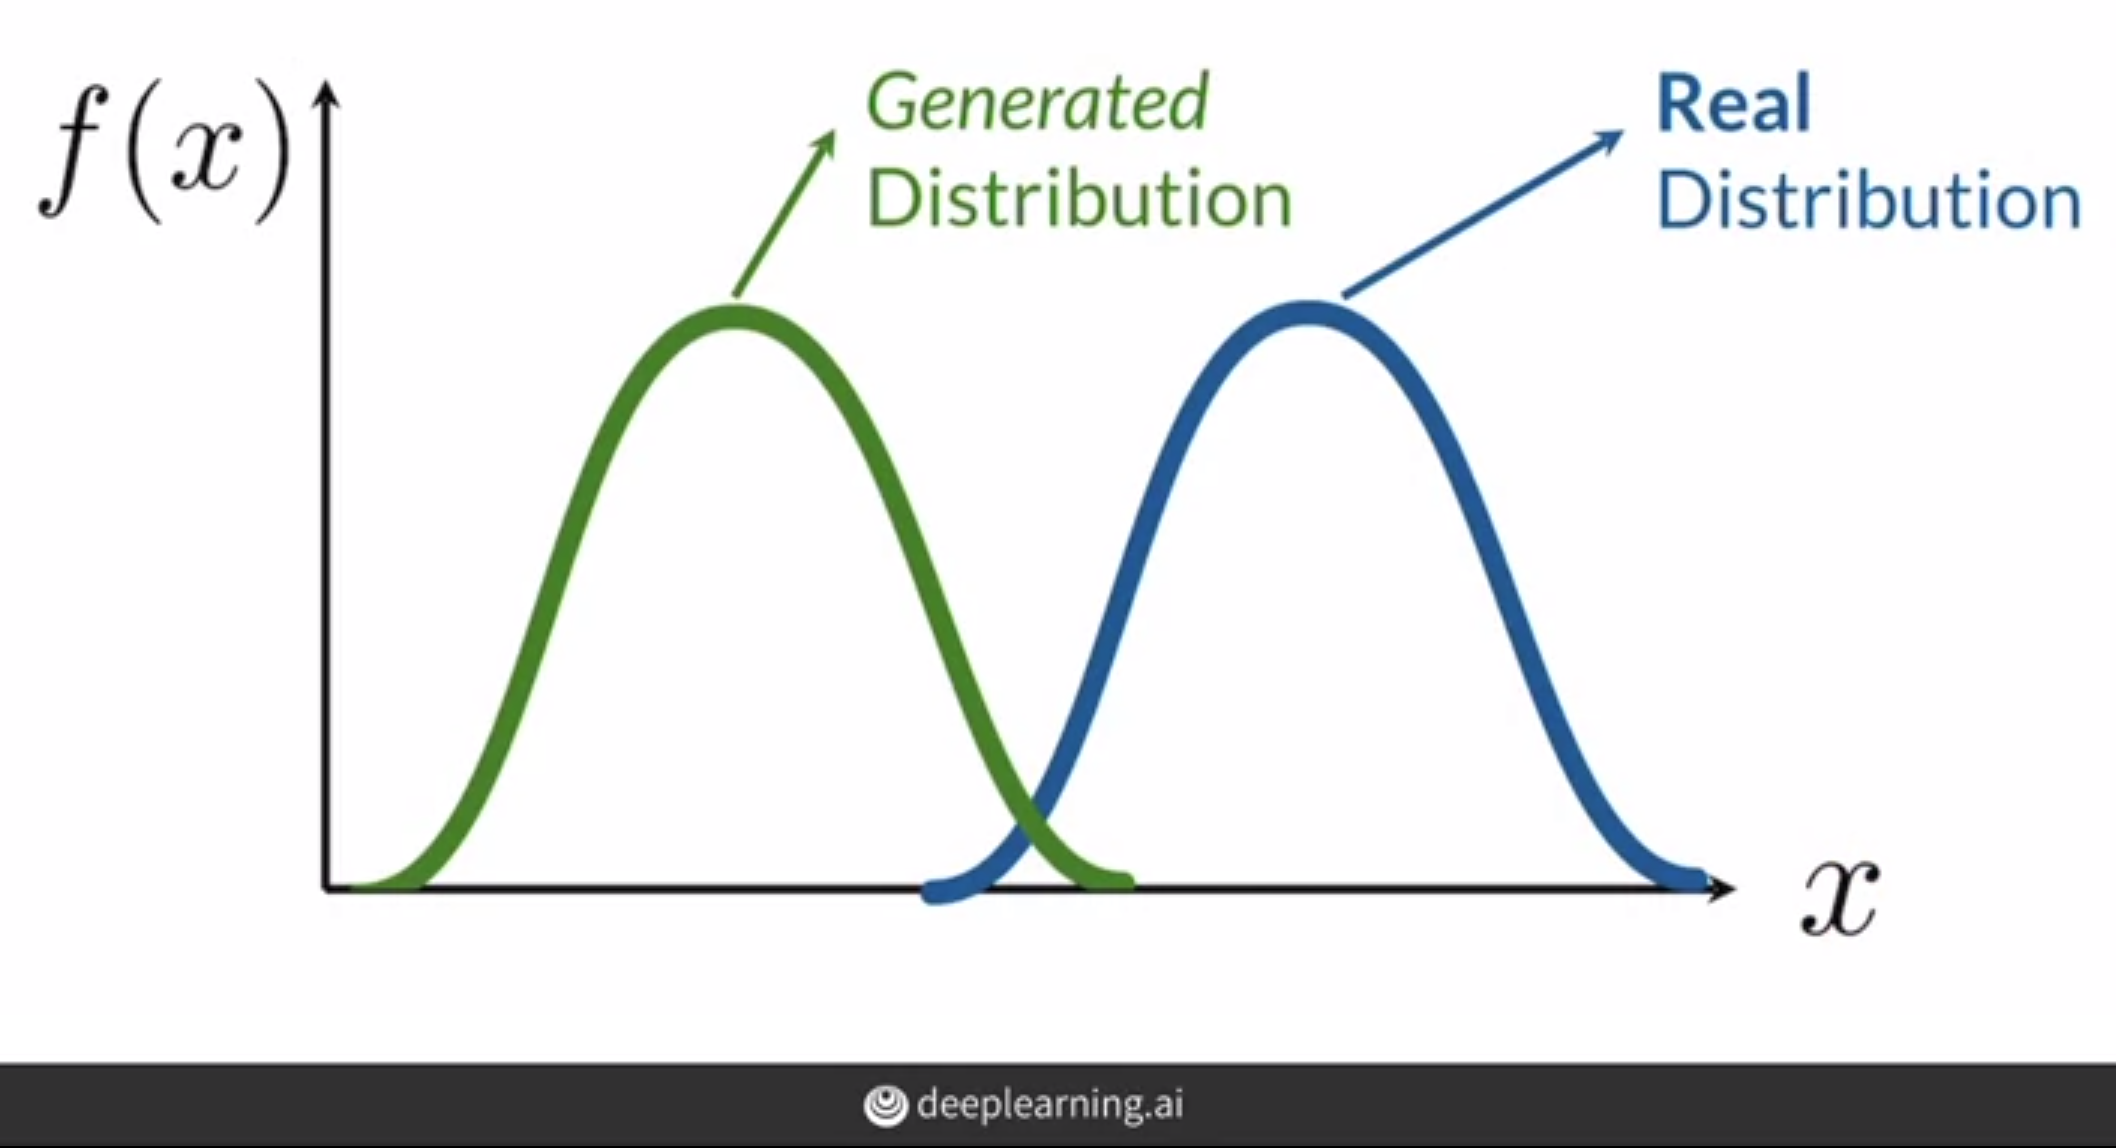
Discriminator wants the real and fake image distributions to be as far as possible while the Generator wants to reduce the distance between the real and fake image distribution. In simple words, the Generator tries to fool the Discriminator by producing real looking images while the Discriminator tries to catch the fake images from the real ones.

Picture from paper
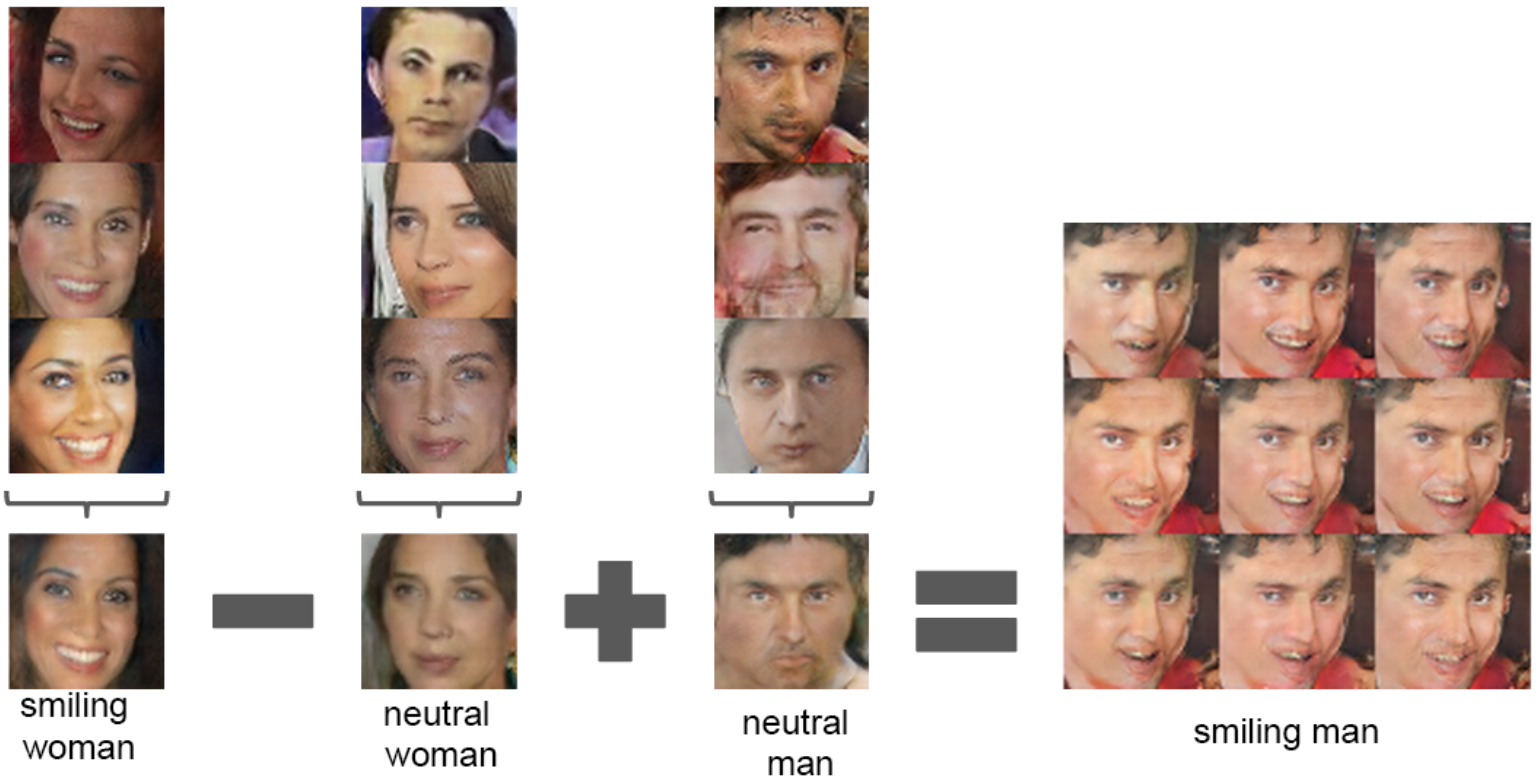
Vector arithmetic for visual concepts. Source: Paper

Training details from the paper

Preprocessing: Images are scaled to be in range of tanh activation, [-1, 1]. Training was done with a mini-batch size of 128 and Adam optimizer with a learning rate of 0.0002. All the weights initialised with Normal distribution \(\mu(0, 0.02)\).

Authors guidelines: - All the pooling layers are replaced with strided convolutions in the discriminator and fractional strided convolution in the discriminator. - No fully-connected or pooling layers are used. - Batchnorm used in both Generator and Discriminator - ReLu activation is used for generator for all the layers except the last layer which uses tanh - Discriminator uses LeakyReLu for all the layers

In this post I will train a GAN to generate celebrity faces. ## Generator A Generator consists Transposed Convolution, Batch Normalisation and activation function layer. - First the random noise of size 100 will be reshaped to 100x1x1 (channel first in PyTorch). - It is passed through a Transposed CNN layer which upsamples the input Tensor. - Batch Normalisation is applied. - If the layer is not the last layer then ReLu activation is applied else Tanh.

First channel size is 1024 which is then decreased block by block to 3 for RGB image. Finally we will get a 3x64x64 Tensor which will be our image.

Generator architecture
Generator architecture from the Paper
Code
import torch
from torch import nn
from torch.utils.data import DataLoader

from torchvision import datasets, transforms
from torchvision.utils import make_grid
from torch.optim import Adam

from tqdm.notebook import tqdm

import matplotlib.pyplot as plt

torch.manual_seed(0)
<torch._C.Generator at 0x7f7b8cf9e6c0>
Code
def show_tensor_images(image_tensor, num_images=25, size=(3, 64, 64)):
    """
    Function for visualizing images: Given a tensor of images, number of images, and
    size per image, plots and prints the images in an uniform grid.
    """
    image_tensor = (image_tensor + 1) / 2
    image_unflat = image_tensor.detach().cpu()
    image_grid = make_grid(image_unflat[:num_images], nrow=5)
    plt.imshow(image_grid.permute(1, 2, 0).squeeze())
    plt.show()
class Generator(nn.Module):
    def __init__(self, in_channels=3, z_dim=100):
        super(Generator, self).__init__()

        self.gen = nn.Sequential(
            self.create_upblock(z_dim, 1024, kernel_size=4, stride=1, padding=0),
            self.create_upblock(1024, 512, kernel_size=4, stride=2, padding=1),
            self.create_upblock(512, 256, kernel_size=4, stride=2, padding=1),
            self.create_upblock(256, 128, kernel_size=4, stride=2, padding=1),
            self.create_upblock(
                128, 3, kernel_size=4, stride=2, padding=1, final_layer=True
            ),
        )

    def create_upblock(
        self,
        in_channels,
        out_channels,
        kernel_size=5,
        stride=2,
        padding=1,
        final_layer=False,
    ):
        if final_layer:
            return nn.Sequential(
                nn.ConvTranspose2d(
                    in_channels, out_channels, kernel_size, stride, padding, bias=False
                ),
                nn.BatchNorm2d(out_channels),
                nn.Tanh(),
            )
        return nn.Sequential(
            nn.ConvTranspose2d(
                in_channels, out_channels, kernel_size, stride, padding, bias=False
            ),
            nn.BatchNorm2d(out_channels),
            nn.ReLU(True),
        )

    def forward(self, noise):
        """
        noise: random vector of shape=(N, 100, 1, 1)
        """
        assert len(noise.shape) == 4, "random vector of shape=(N, 100, 1, 1)"

        return self.gen(noise)

Discriminator

The architecture of a Discriminator is same as that of a normal image classification model. It contains Convolution layers, Activation layer and BatchNormalisation. In the DCGAN paper, strides are used instead of pooling to reduce the size of a kernel. Also there is no Fully Connected layer in the network. Leaky ReLU with leak slope 0.2 is used.

The Discriminator wants to predict the fake images as fake and real images as real. On the other hand the Generator wants to fool Discriminator into predicting the fake images produced by the Generator as real.

Gan objective
Source: deeplearning.ai GANs Specialisation
class Discriminator(nn.Module):
    def __init__(self, im_chan=3, hidden_dim=32):
        super(Discriminator, self).__init__()
        self.disc = nn.Sequential(
            self.make_disc_block(im_chan, hidden_dim),
            self.make_disc_block(hidden_dim, hidden_dim * 2),
            self.make_disc_block(hidden_dim * 2, hidden_dim * 4, stride=1),
            self.make_disc_block(hidden_dim * 4, hidden_dim * 4, stride=2),
            self.make_disc_block(hidden_dim * 4, 1, final_layer=True),
        )

    def make_disc_block(
        self,
        input_channels,
        output_channels,
        kernel_size=4,
        stride=2,
        final_layer=False,
    ):
        if not final_layer:
            return nn.Sequential(
                nn.Conv2d(input_channels, output_channels, kernel_size, stride),
                nn.BatchNorm2d(output_channels),
                nn.LeakyReLU(0.2),
            )
        else:
            return nn.Sequential(
                nn.Conv2d(input_channels, output_channels, kernel_size, stride)
            )

    def forward(self, image):
        disc_pred = self.disc(image)
        return disc_pred.view(len(disc_pred), -1)

Define learning rate, z_dim (noise dimension), batch size and other configuration based on the paper.

Code
# Configurations are from DCGAN paper
z_dim = 100
batch_size = 128
lr = 0.0002

beta_1 = 0.5
beta_2 = 0.999
device = "cuda"
Code
def weights_init(m):
    classname = m.__class__.__name__
    if classname.find("Conv") != -1:
        nn.init.normal_(m.weight.data, 0.0, 0.02)
    elif classname.find("BatchNorm") != -1:
        nn.init.normal_(m.weight.data, 1.0, 0.02)
        nn.init.constant_(m.bias.data, 0)


gen = Generator().to(device)
disc = Discriminator().to(device)


gen_optimizer = Adam(gen.parameters(), lr, betas=(beta_1, beta_2))
disc_optimizer = Adam(disc.parameters(), lr, betas=(beta_1, beta_2))


gen = gen.apply(weights_init)
disc = disc.apply(weights_init)
Code
# You can tranform the image values to be between -1 and 1 (the range of the tanh activation)
transform = transforms.Compose(
    [
        transforms.Resize(64),
        transforms.CenterCrop(64),
        transforms.ToTensor(),
        transforms.Normalize((0.5, 0.5, 0.5), (0.5, 0.5, 0.5)),
    ]
)

dataloader = DataLoader(
    datasets.CelebA(".", download=True, transform=transform),
    batch_size=batch_size,
    shuffle=True,
)

Training Loop

Binary Crossentropy loss, \(J(\theta) = -1/m \sum[y^i logh[X^i, \theta] + (1-y^i)log(1-h[X^i, \theta)]\), for training DCGAN.

Discriminator Loss

As the discriminator wants to increase the distance between Generated and Real distribution, we will train it to give high loss when the generated images is classified as real or when real images are classified as fake.

Generator Loss

The BCE loss for Generator will be high when it fails to fool the Discriminator. It will give high loss when the generated image is classified as fake by the discriminator. Note that the Generator never know about real images.

criterion = nn.BCEWithLogitsLoss()
display_step = 500
n_epochs = 50
cur_step = 0
mean_generator_loss = 0
mean_discriminator_loss = 0
for epoch in range(n_epoch):
    for real, _ in tqdm(dataloader):
        real = real.to(device)

        # update the discriminator
        # create fake images from random noise
        disc_optimizer.zero_grad()
        noise = torch.randn(cur_batch_size, z_dim, 1, 1, device=device)
        fake_images = gen(noise)
        logits_fake = disc(fake_images.detach())
        logits_real = disc(real)

        disc_loss_fake = criterion(fake_logits, torch.zeros_like(loss_fake))
        disc_loss_real = criterion(real_logits, torch.ones_like(logits_real))

        disc_loss = (disc_loss_fake + disc_loss_real) / 2
        # Keep track of the average discriminator loss
        mean_discriminator_loss += disc_avg_loss.item() / display_step

        disc_loss.backward(retain_graph=True)
        disc_optimizer.step()

        # Update the generator
        gen_optimizer.zero_grad()
        noise = torch.randn(cur_batch_size, z_dim, 1, 1, device=device)
        fake_images = gen(noise)
        logits_fake = disc(fake_images)

        gen_loss = criterion(logits_fake, torch.ones_like(logits_fake))
        gen_loss.backward()
        gen_optimizer.step()

        # Keep track of the average generator loss
        mean_generator_loss += gen_loss.item() / display_step

        ## Visualization code ##
        if cur_step % display_step == 0 and cur_step > 0:
            print(
                f"Step {cur_step}: Generator loss: {mean_generator_loss}, discriminator loss: {mean_discriminator_loss}"
            )
            show_tensor_images(fake_images)
            show_tensor_images(real)
            mean_generator_loss = 0
            mean_discriminator_loss = 0
        cur_step += 1

References

[1.] Unsupervised Representation Learning with Deep Convolutional Generative Adversarial Networks

[2.] Generative Adversarial Networks (GANs) Specialization

[3.] DCGAN Tutorial - PyTorch Official

I would highly recommend GANs Specialization on Coursera if you want to learn GANs in depth.