AI is revolutionizing the world. Face recognition is one such spectrum of it. Almost everyone uses face recognition systems — on our mobile, Facebook, Photo gallery apps or advanced security cameras. Learn how these systems are able to recognize our faces.
This article is inspired by the deeplearning.ai course on FaceNet.
Face Verification vs. Face Recognition
Face Verification checks “is this the claimed person?”. For example, in school, you go with your ID card and the invigilator verifies your face with the ID card. This is Face Verification. A mobile phone that unlocks using our face is also using face verification. It is 1:1 matching problem.
Now suppose the invigilator knows everyone by their name. So, you decide to go there without an ID card. The invigilator identifies your face and lets you in. This is Face Recognition. Face Recognition deals with “who is this person?” problem. We can say that it is a 1:K problem.
Why pixel-by-pixel comparison of images is a bad idea?
A simple way for face verification can be comparing two images pixel-by-pixel and if the threshold between images is less than a threshold then we can say that they’re the same person. But since the pixel values in an image change dramatically even with a slight change of light, position or orientation. So, this method doesn’t work well.
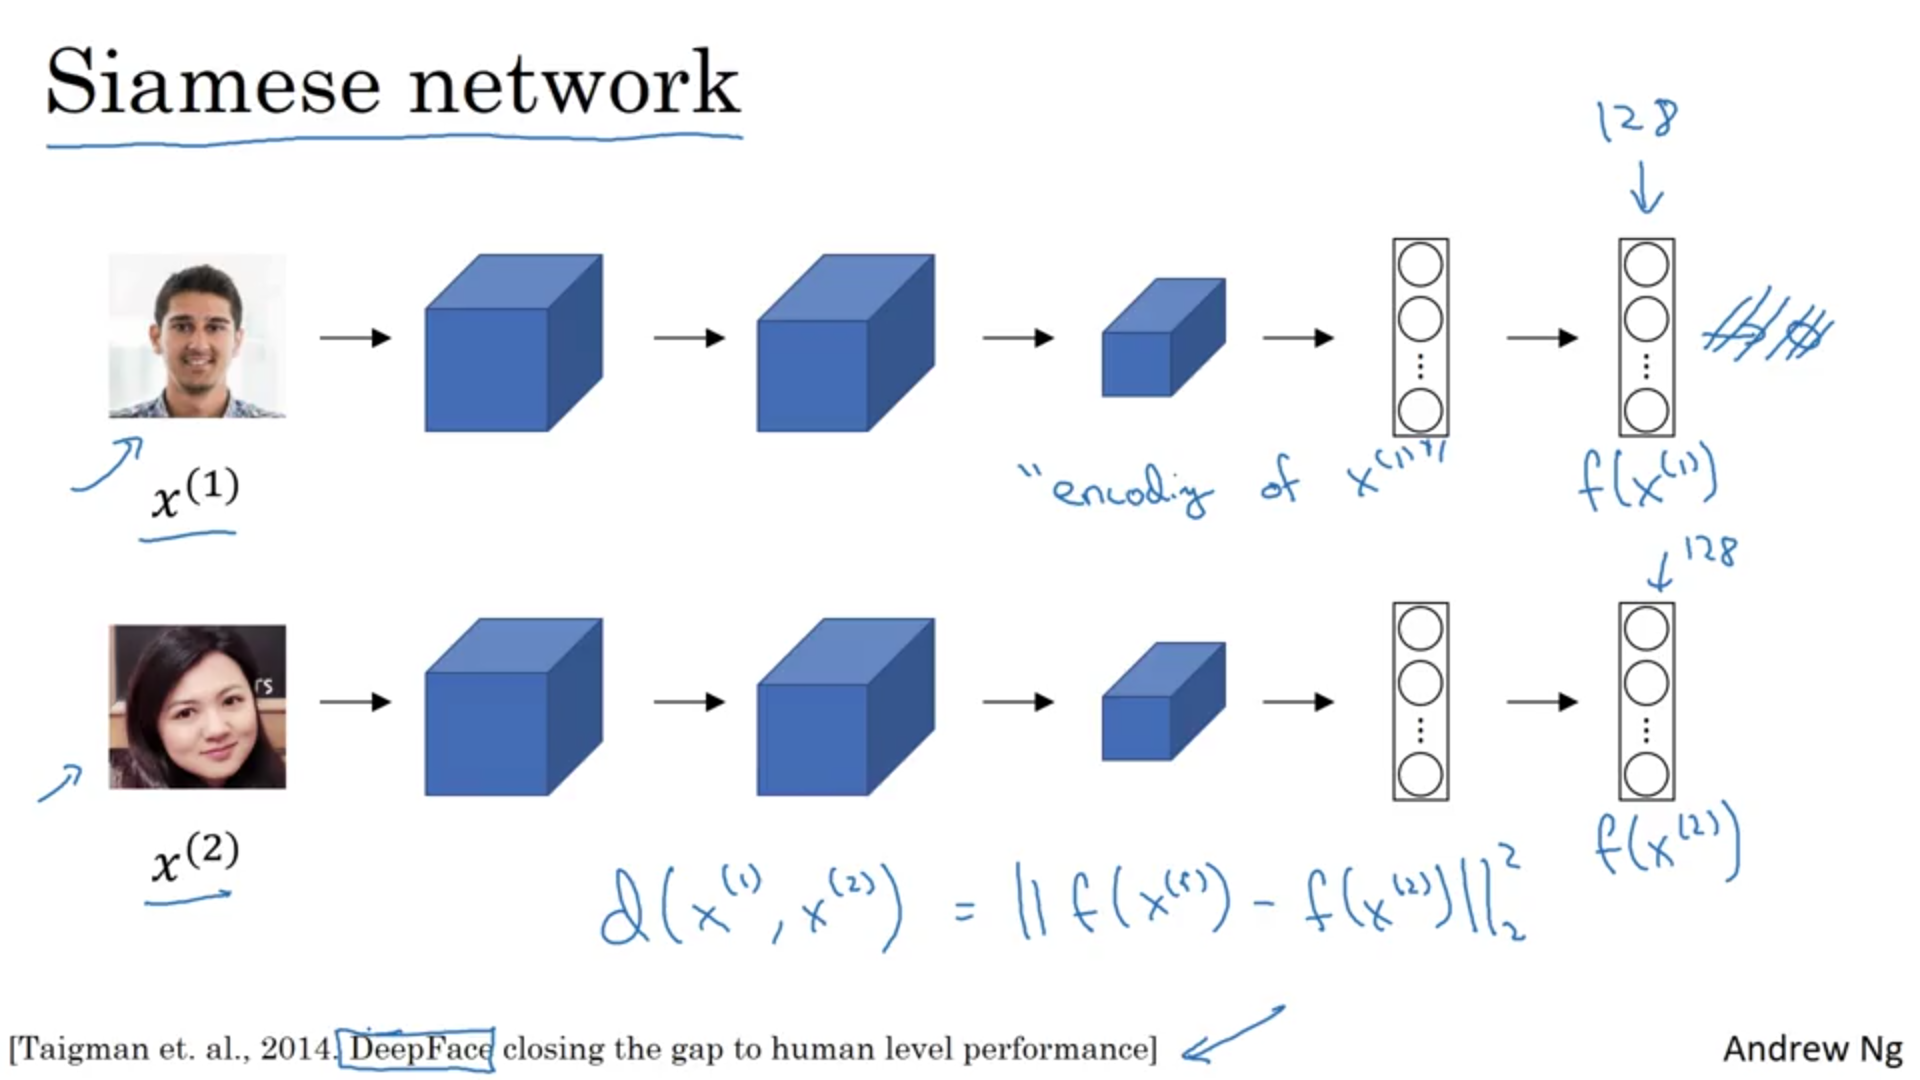
Face Embedding come to the rescue
The embedding is represented by f (x), a d-dimensional vector. It encodes an image ‘x’ into a d-dimensional Euclidean space. The face embedding of two images of the same person are similar to each other and that of different persons are very different.
In ConvNet architectures, the initial layers learn to recognize basic patterns like straight lines, edges, circles, etc. and the deeper layers learn to recognize more complex patterns like numbers, faces, cars, etc.
To get our embedding we feed the image into a pre-trained model then run a forward propagation and extract the vector from some deeper Fully-Connected layer. You can learn the basics of CNN here.
How to finetune embeddings?
The Triplet Loss function takes the responsibility to push the embeddings of two images of the same person (Anchor and Positive) closer together while pulling the embeddings of two images of different persons (Anchor, Negative) further apart.
 Source: Coursera
\(\|\|f(X1) — f(X2)\|\|²\) is the degree of similarity between image X1 and X2. If it’s smaller than a chosen threshold then both are the same person.
If you’re wondering “what this \(\|A\|\) weird symbol is?”, it’s called Frobenius Norm.
The distance between Anchor and Positive images should be less and the distance between Anchor and Negative images should be high.
i.e. \(∥f(Anchor) — f(Positive)∥² ≤ ∥f(Anchor) — f(Negative)∥²\).
Training a Face recognition model is computationally expensive so it’s recommended to download a pre-trained model.
Start with creating a database of persons containing an embedding vector for each.
#create a dictionary database
db = dict()
#encoding(image_path) converts image to embedding
db['person1'] = encoding('person1.jpg')
db['person2'] = encoding('person2.jpg')
db['person3'] = encoding('person3.jpg')
db['person4'] = encoding('person4.jpg')
db['person5'] = encoding('person5.jpg')
Face Verification
Now that we have created our database, we can define a function that accepts image embedding and name of the person as the argument and it will verify if they are the same person.
def verify(embedding, person_name):

    # numpy.linalg.norm calculates the Frobenius Norm
    dist = np.linalg.norm(embedding - db[person_name])

    # Chosen threshold is 0.7
    if dist < 0.7:
        print("Verified! Welcome " + person_name)
    else:
        print("Person name and face didn't match!")
Hurray 😎! We created our Face Verification system. Now let’s create the Face Recognition System. If you remember, a person doesn’t need any ID in the face recognition system. He just needs to show his face to the camera.
Face Recognition
In Face recognition, the distance will be calculated for all the images in the database against the input embedding and the smallest distance has to be searched.
def recognize_me(input_embedding):

    # Set min_dist to infinity
    min_dist = np.inf

    # Iterate over the database to calculate distance for each person*
    for (name, emb) in db.items():

        # Compute the distance*
        curr_dist = np.linalg.norm(input_embedding - emb)

        # identity is set to the name of the person from the database whose distance is smallest against the input encoding
        if curr_dist < min_dist:
            min_dist = curr_dist
            identity = name

    if min_dist > 0.7:
        print("Sorry! You’re not in the database.")
    else:
        print ("Hi! Welcome " + identity)
Congratulations!! 👏👏 You have created your own Face Recognition system.
You can provide your feedback in comment section below.
Follow me on Twitter